While there are many excellent pre-made Faraday bags that you can buy, building your own can be both rewarding and cost-effective.
After experimenting with both store-bought and DIY options, I’ve discovered that a well-made homemade Faraday bag can achieve impressive signal blocking capabilities – often blocking over 99% of RF signals – for under $6.

If you’re interested in buying one instead, check out my thoroughly tested signal blocking pouches that I’ve personally evaluated. For those needing specialized protection, I’ve also tested Faraday backpacks and heavy-duty duffel bags designed for larger equipment. But if you’re ready to tackle a DIY project, this guide will walk you through creating your own professional-grade Faraday bag.
- DIY vs. Buying: A Cost Comparison
- What's a Faraday Bag?
- DIY Materials and Tools
- 1. Quick Aluminum Foil Method (Under $6)
- 2. Stronger Copper Shielding Tape Method
- 3. Long-Lasting Fabric Method
- Advanced Multi-Layer Protection
- Testing Your DIY Faraday Bag
- Practical Uses for Your DIY Faraday Bag
- Tips From My Mistakes
- Maintenance Tips
- Safety Tips
DIY vs. Buying: A Cost Comparison
While building your own Faraday bag can be a fun project, it’s worth noting that buying Faraday bags have become much more affordable in recent years. Here’s what you should consider:
Buying Faraday Bags
- This phone bag for $25 (with over 6,400 positive reviews on Amazon)
- This key fob pouch for $10 (with over 49,000 positive reviews)
- This laptop bag for $17 (with over 1,300 positive reviews)

While DIY offers customization and can be a fun project, commercial bags have become quite affordable and offer reliable protection with warranties.
Unless you specifically need a custom size or enjoy DIY projects, buying a pre-made bag is often the practical choice. The aluminum foil method remains useful for quick temporary solutions.
What’s a Faraday Bag?
A Faraday bag blocks wireless signals from reaching your phone, car key, or other electronic devices. Think of it like a shield that stops signals from getting in or out. When I first tried making one, I learned that even tiny gaps can let signals through, so we’ll focus on making it properly sealed.
Here’s what makes a Faraday bag effective:
- The conductive material needs to completely surround your device
- Any gaps or seams can leak signals
- Multiple layers provide better shielding than a single thick layer
- The type of conductive material matters significantly
DIY Materials and Tools
Before diving into the construction methods, here’s a comprehensive list of the materials and tools you might need. Note that you won’t need everything listed below – the specific materials depend on which construction method you choose to follow. I’ll specify the exact requirements for each method in their respective sections.
Basic Materials (costs about $5-6):
- Heavy-duty aluminum foil
- A plastic zip-top bag
- Scissors
- Tape
- Measuring tape
Better Materials (costs about $15-50):
- Faraday fabric kit comes with tape (multiple size options)
- Copper Faraday fabric (for advanced multi-layer protection)
- Conductive tape
- Cotton fabric for inner lining (or plastic, bag or box)
- Velcro or magnets for closing it
- Optional: Heavy-duty nylon for outer protection
- Optional: Conductive mesh for structured bags
Tools:
- Scissors
- Sewing machine (though hand sewing is possible), or use conductive tape instead
- Measuring tape
Total cost typically runs between $5-50 depending on where you source materials.
Note on Testing: While specialized testing equipment like RF meters exists, this guide will show you how to effectively test your Faraday bag using common devices you already own, such as your phone or key fob. Detailed testing methods are covered in the Testing section.
1. Quick Aluminum Foil Method (Under $6)
If you need a quick (and cheap) signal blocking solution and don’t have specialized materials on hand, aluminum foil can create a basic Faraday bag. While not as durable or reliable as the fabric version, it’s perfect for temporary use or testing the concept before investing in better materials.
Materials Needed
- Heavy-duty aluminum foil
- Plastic zip-top bag or box (slightly larger than your device)
- Scissors
- Tape (aluminum or other conductive is best)
Step-by-Step Instructions
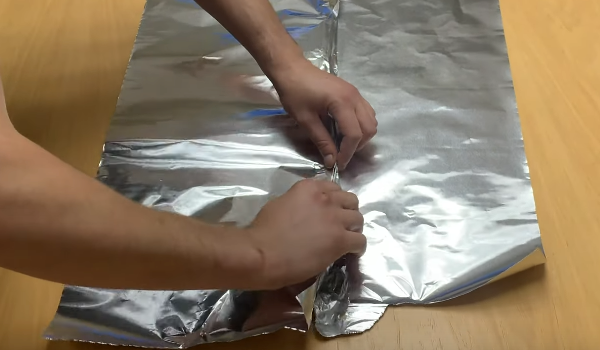
1. Prepare the Base Layer
- Cut a piece of foil about 3 times the size of your device
- Carefully smooth out any wrinkles or creases
- If the foil tears, start over with a new piece
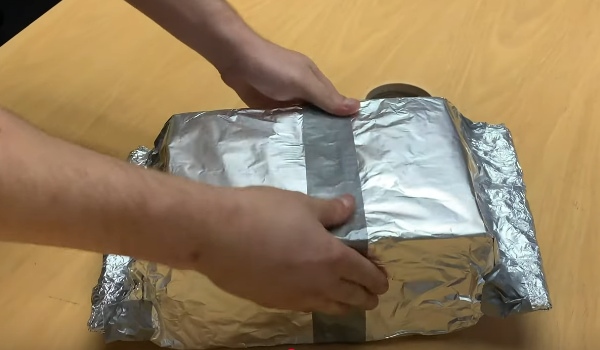
2. Create the Pouch
- Place your device (in a plastic bag or box) in the center of the foil
- Fold the sides up around the device
- Fold the remaining edges to create a sealed packet
- Use tape to secure the folds if needed
3. Add Additional Layers
- Cut a second piece of foil slightly larger than your first packet
- Wrap the entire packet again, folding edges in the opposite direction
- Repeat for a third layer
- Each layer should completely cover any seams from previous layers
Tips for Success
- Always use at least three layers of foil
- Make your folds as tight as possible
- Avoid tearing the foil – even small holes can let signals through
- Consider adding a paper or cardboard outer layer for durability
- Test thoroughly before relying on it
Limitations
- Less durable than fabric versions
- Needs frequent replacement
- Can tear easily during use
- May not be suitable for daily handling
- Should be considered a temporary solution
2. Stronger Copper Shielding Tape Method
The video below shows you how to make a quick and effective DIY Faraday bag using just a plastic bag, copper shielding tape, and magnets. This simple method works for everything from car keys to laptops – just choose your bag size!
It will show you how to create a reliable signal-blocking pouch that’s easy to repair and features a convenient magnetic closure. Quick tip: handle the copper tape carefully as edges can be sharp.
Materials:
- Zip-loc bag (any size)
- Copper shielding tape
- Thin magnets
Test it with your phone to ensure it’s blocking signals effectively!
3. Long-Lasting Fabric Method
This is how I make bags that last for a long time:
- Cut two pieces of Faraday fabric slightly bigger than your device
- Sew three sides together (or use conductive tape)
- Add a cotton liner to protect your device
- Attach Velcro at the top for closing
Advanced Multi-Layer Protection
For maximum security, consider this advanced layering technique:
- Create an inner layer using copper Faraday fabric
- Add a middle layer of conductive fabric
- Use an outer layer of durable material
- Ensure all layers are properly connected at the seams
Testing Your DIY Faraday Bag
Here’s how I test every bag I make:
- Put your phone in the bag
- Try calling it
- If it rings, your bag isn’t working right
- Check for any gaps and fix them
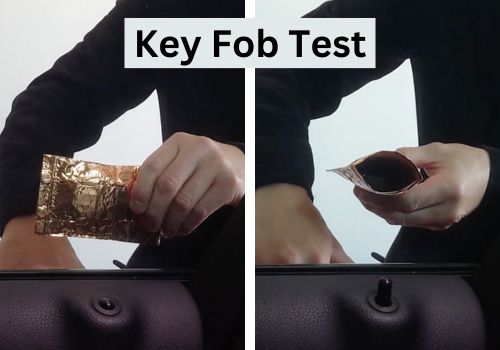
Key Fob Test:
Simply place your key fob inside your bag and close it. Try to open your car door. If it doesn’t open the bag has successfully blocked all signals. If it opens while the bag is closed then there is a leak and your bag is no good.
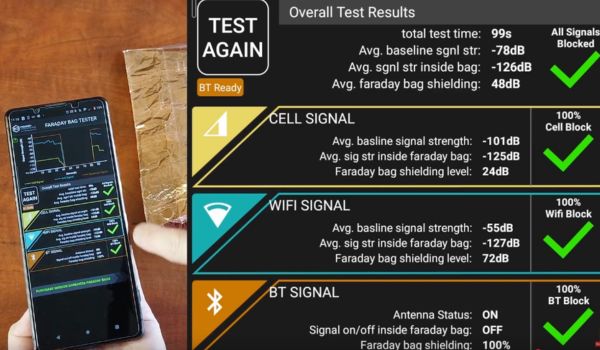
Signal Testing Apps
Before relying on your DIY Faraday bag for privacy protection, it’s important to verify its effectiveness using signal testing apps. While a basic call test is helpful, these apps can provide more detailed measurements of signal blocking performance.
Recommended Apps:
- MD Faraday Bag Tester (Android and iOS)
- Network Signal Info Pro (Android)
- Signal Strength (iOS)
- Field Test Mode (built into iOS – dial 3001#12345#)
Testing Process
- Install a signal testing app on your device
- Take baseline measurements
- Record signal strength outside the bag
- Note readings for cellular, WiFi, and Bluetooth signals
- Save screenshots for comparison
- Test with Device in Bag
- Place device in your Faraday bag
- Seal it completely
- Check signal readings again
- Look for significant drops in signal strength
- Effective bags should show minimal to no signal detection
What to Look For
- Cellular signal should drop to -110 dBm or lower
- WiFi networks should become undetectable
- Bluetooth connections should fail to establish
- GPS coordinates should stop updating
Common Issues
- If signals still register, check for gaps in your bag’s coverage
- Test all sides of the bag – weak spots can appear at seams
- Some apps may show residual signal detection even when blocked
- Multiple tests from different angles provide the most accurate results
Remember: No blocking solution is perfect, but your DIY bag should show a significant reduction in all signal types when tested with these apps.
Practical Uses for Your DIY Faraday Bag
Here’s what your Faraday bag can protect against:
- Car Key Protection
- Prevents electronic car theft attempts
- Blocks relay attacks on keyless entry systems
- Test it by trying to open your car with the key inside the bag
- Phone and Device Privacy
- Blocks GPS tracking
- Prevents wireless signal interception
- Stops location tracking
- Useful during sensitive meetings or when you want to go offline
- Card and ID Protection
- Shields against RFID/NFC scanning of credit cards, passports, and ID cards
- Especially useful when traveling or in crowded areas
Want to learn more? Check out my detailed guide on six essential reasons why Faraday bags are becoming must-have items in today’s connected world.
Note: While a properly constructed Faraday bag can help protect against EMP events and corporate espionage, these uses require more specialized construction methods than covered in this DIY guide.
For those concerned about emergency preparedness, understanding what an EMP attack is and how to protect against it can help inform your protection strategy. Additionally, if you work with solar equipment, you might be interested in my guide to specialized Faraday protection for solar panels.
Tips From My Mistakes
Through my many failed attempts, I’ve identified these crucial pitfalls:
- Always use at least three layers of foil
- Check the bag for tears before each use
- Make the closure extra wide
- Test the bag regularly
Maintenance Tips
To keep your Faraday bag functioning effectively:
- Clean with a dry cloth only
- Store in a dry place
- Check seams monthly for wear
- Test effectiveness regularly
- Replace if you notice any degradation in shielding
Safety Tips
While building your Faraday bag, remember:
- Some conductive fabrics can irritate skin
- Avoid creating sharp edges with the conductive material
- Don’t rely on DIY bags for critical security needs
- Test regularly if using for emergency preparedness
- Always have a backup plan for essential communications
Remember: A Faraday bag is only good if it’s made carefully. Take your time, test it thoroughly, and fix any problems you find. I’ve learned that patience makes the difference between a bag that works and one that doesn’t.